Author: Andrew V

  • Essential APT Commands: A Quick Reference

    The well known APT or Advanced Package Tool is a commandline package manager used in Debian based linux distributions. It provides commands for searching, managing and querying information about packages. In this article we will illustrate its basic commands and options.

    Installing Packages

    The most basic functionality of any package manager is to be able to install packages. Apt allows for the installation of single or multiple packages as well as .deb files. To install a single package with apt we use the following structure.

    Sometimes we want to install a specific version of a package:

    To install multiple packages we simply add another package name to our command.

    If you have already downloaded a .deb package locally and you wish to install it you simply provide apt with the package’s location on your system instead of its package name.

    To reinstall a package use the reinstall option.

    To view all packages available to the system use list. To view all installed packages you use list --installed.

    To see if a package is installed or not with apt you can copy the following command. The -qq flag is an option to query the following package. Using -q returns the same results. Alternatively you can use grep to filter through the results of apt list --installed via pipe.

    You can search for a package in the repositories using the search option and to view the details of a package you use the show option.

    To view all the dependencies of a package:

    To locate an installed package type the following command. The -L flag is the option that lists all directories associated with the package.

    Which package provides a file ?

    Sometimes we are trying to install a package only to be met with some errors about some missing files. We can search apt for those files in order to find out which package provides them and install them. To do so we need the apt-file package.

    Updating Packages

    The update option of the apt tool allows us looks for updates for all our installed packages and returns a list with all packages that can be updated. We can then run the upgrade option to upgrade some or all. The upgrade command by default upgrades all packages except for those that create a problem with their dependencies. To upgrade these packages you need to use dist-upgrade instead of upgrade.

    To upgrade just a specific package you use the following syntax:

    Pinning Packages

    It is possible to “pin” packages to specific versions so that they do not update even if a new version becomes available. To do so you need to create a file in /etc/apt/preferences.d/ and specify three things – the package, the version, and the pin priority. In this case we’ll call the file repository-priority and use nano to edit the files.

    Add the following lines:

    NOTE: Pin priority is a setting which is very useful when multiple repositories offer the same package. It determines which repository gains what priority.

    Removing Packages

    To remove a package we use the remove option. Similar to installing multiple packages, to remove more than one simply add its package name to the commandline.

    To remove unnecessary packages we can use the autoremove option. This option uninstalls any dependency that is not required by any installed packages.

    To uninstall a package alongside its configuration files we use the purge option. You can purge more than one package in a single command like you can install or remove multiple packages. The formatting remains the same, simply add its package name to the command.

    Managing Repositories

    To add repositories to APT there are two steps we need to follow with the first being optional and depends on the repository. The first is to add a GPG key associated with the repository to our system and the second is to add the repository itself. The form of the command to add a repository looks like this:

    Suppose you want to add the wine repository to debian and then remove it. To add it you fill in the repository URL with wine’s repository. Always apt update after adding a repository.

    To remove it you add --remove as an option.

    If you want to remove all the unused old repositories then you can use the following command:

  • Environment variables in Linux

    In the world of Linux, environment variables play a crucial role in customizing system behavior and providing configuration options for various applications. Understanding how to set and verify environment variables is essential. In this guide, we will dive into the intricacies of environment variables and walk you through the step-by-step process of setting and verifying them in Debian.

    First, lets take a look at what exactly is an environment variable. Environment variables are dynamic values that can be set at the operating system level and are accessible to processes and programs running on a system. They provide a way to customize and configure the behavior of applications, define system-wide settings, and provide information about the system’s environment. Environment variables are widely used in Linux and other operating systems to influence the behavior of software, determine search paths for executables, specify language settings, define temporary file locations, and more.

    There are several commonly used environment variables that play a significant role in configuring and customizing the behavior of systems and applications. One such variable is “PATH,” which specifies the directories where the operating system looks for executable files. Another important variable is “HOME,” which represents the user’s home directory. “LANG” defines the default language setting for the system, while “TMPDIR” points to the directory for temporary files. “DISPLAY” specifies the X server display to use for graphical applications. Additionally, “JAVA_HOME” indicates the installation directory of the Java Development Kit (JDK). These are just a few examples of the multitude of environment variables available, each serving a specific purpose in system configuration and application functionality.

    To check the environment variables and their respective values on your system, you can use the command-line interface. In Linux, open a terminal and type the command printenv or env and press Enter. This will display a list of all environment variables currently set on your system, along with their corresponding values. The output will provide you with a comprehensive overview of the environment variables available, allowing you to examine and access their values as needed. This can be particularly useful for troubleshooting, verifying specific settings, or gaining insights into the configuration of your system.

    Setup a temporary environment variable

    To set a temporary environment variable, you can use the command-line interface in your operating system. In Linux, open a terminal and use the “export” command followed by the variable name and its desired value, separated by an equal sign. For example, to set a temporary variable named “MY_VARIABLE” to the value “Hello World” you would need to open a terminal and enter :

    To check the value of a single environment variable like MY_VARIABLE you can use the echo command. It should return ‘Hello World’.

    This sets the variable only for the current session, and it will not persist beyond that. This approach is useful when you need to define a variable temporarily for a specific task or session without affecting the system-wide environment. Once you close the terminal or start a new session, the temporary variable will no longer be available.

    Setup a permanent environment variable

    Permanent environment variables are those that persist across different sessions and remain available even after restarting the system. These variables are typically set in configuration files specific to the user or system. In Linux, a common approach is to define permanent environment variables in the user’s ~/.bashrc or ~/.profile file. By adding the necessary export statements to these files, the variables become available every time a new terminal session is started. Additionally, system-wide environment variables can be set in the /etc/environment file, which ensures their availability to all users on the system. Permanent environment variables are particularly useful for configuring default settings, defining paths for executable files, specifying default language settings, or providing application-specific configurations.

    The main difference between setting up an environment variable in ~/.bashrc and ~/.profile lies in their purpose and scope:

    • .bashrc: This file is specific to the Bash shell and is executed for each interactive Bash session. It is typically used for defining shell-specific configurations, aliases, and functions. Environment variables set in ~/.bashrc are specific to the Bash shell and are not automatically inherited by other types of shells or non-interactive sessions.
    • .profile: This file is more general and is executed by various shell types, including Bash. It is executed once during login and is responsible for setting up environment variables and other configurations that are applicable to the entire user session, regardless of the shell type. Environment variables set in ~/.profile are inherited by both interactive and non-interactive shells.

    In summary, if you want an environment variable to be available in all types of shells and sessions, you should set it in ~/.profile. On the other hand, if you only want the variable to be available in interactive Bash sessions, you can set it in ~/.bashrc. However, in Debian-based systems, the default configuration usually sources ~/.bashrc from ~/.profile, which means that setting the variable in either file will usually achieve the desired result.

    We will use the ~/.profile to setup our environment variable. There is only one additional setup to setting up a permanent environment variable compared to a temporary and that is editing the aforementioned file.

    Once you are editing the file, simply add export MY_VARIABLE="Hello World" at the end, save and exit(CTRL+X and then Y). For the variable to take effect you need to either log out and log back in or type source ~/.profile (or bashrc) in the terminal. To verify that your environment variable works you can echo $MY_VARIABLE like we did in the previous example with the temporary environment variables.

    Conclusion

    Thats it ! Now you know how to setup environment variables in a debian-based system. Ofcourse in a realistic scenario your variables might be a tad more complicated than what we did here but the gist is just that.

    1. If you would like to read more about environment variables in Debian you can read the official documentation.
    2. If you are curious about environment variables in general there is a great article at Wikipedia.
  • Kael Anosh

    Kael Anosh

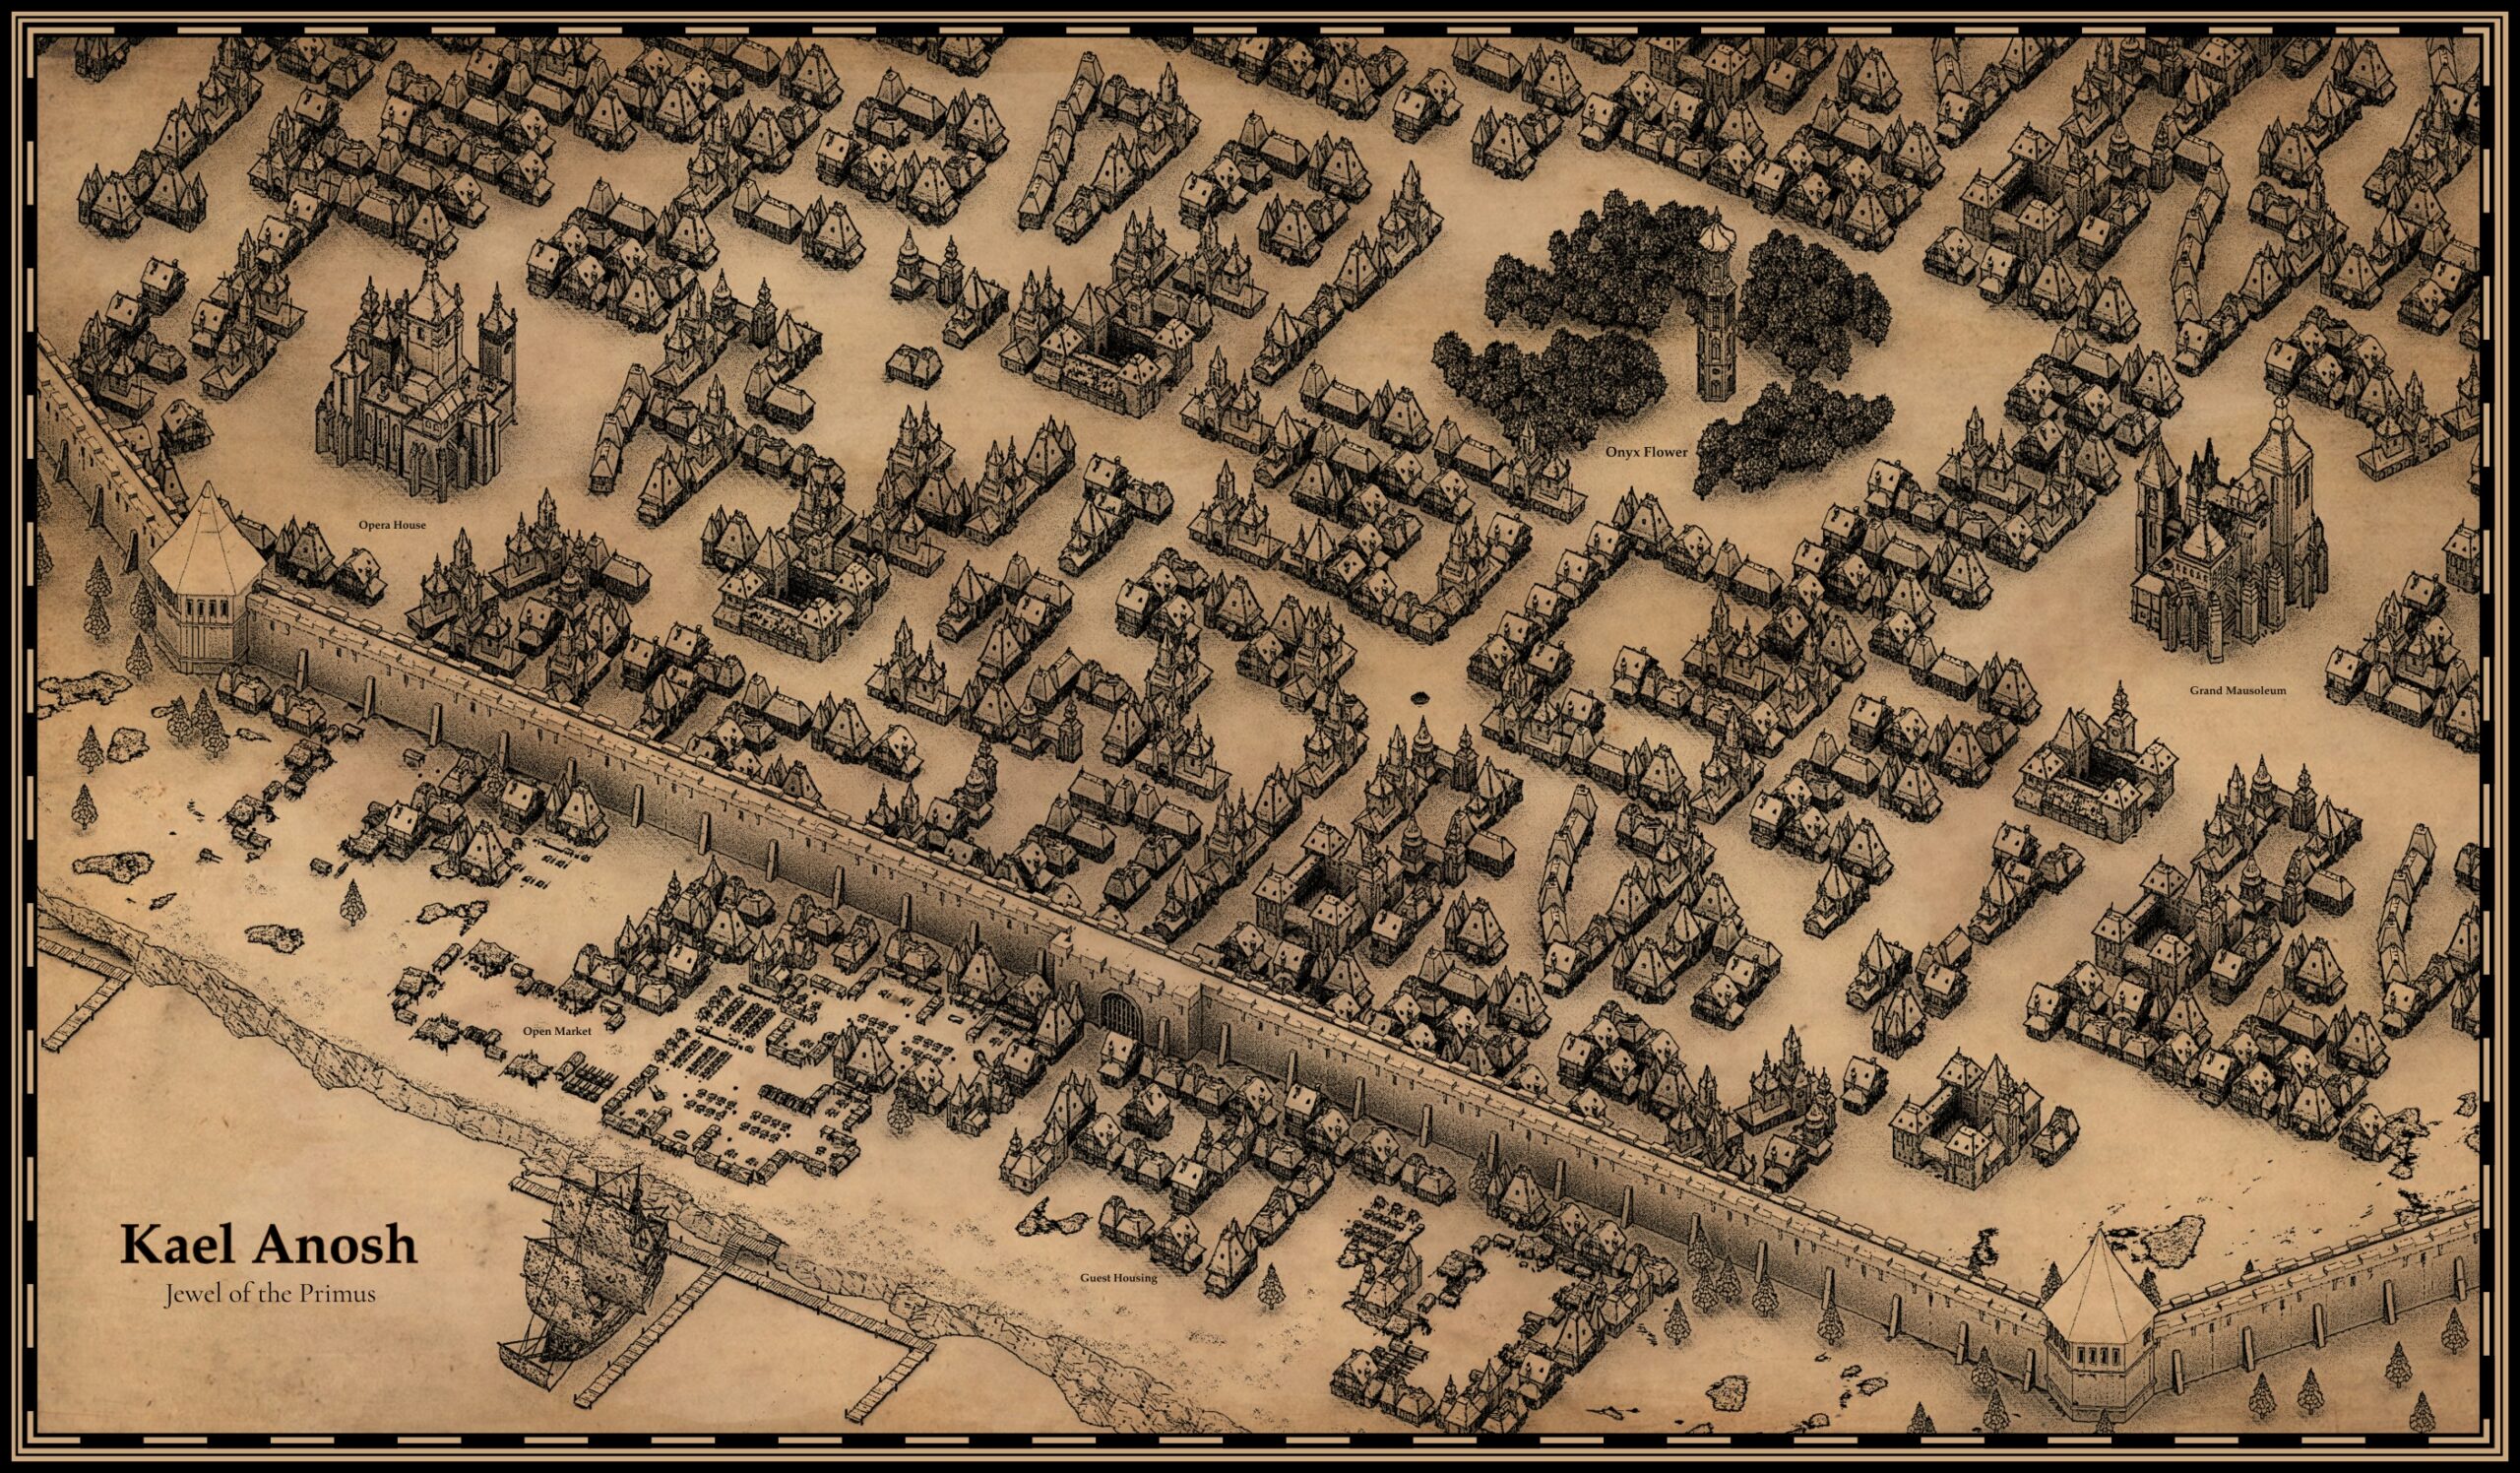
    Another map for Soulmist. This is for the city of the vampiric race ‘Primus’. The Primus have established three major cities on the continent but Kael Anosh is the only city that the Primus allow to interacts with other races—and only at their discretion. Once per year, as the tides shift, the city briefly transforms into a bustling trade hub. During this time, other races are permitted to establish a marketplace outside the city walls, provided they respect its strict laws. To accommodate visiting merchants, the Primus have built guest housing, also outside the walls, which can be rented for the duration of their stay.

    Inside the city, three key locations define its identity:

    • The Onyx Flower – The only academy of blood magic in Kael Anosh and the most important institution in the city.
    • The Disc of Ascension – A grand theater and opera stage, serving as the cultural heart of the Primus.
    • The Mausoleum – A sacred site where the Primus venerate their sleeping or departed elders.

    The Challenges of Mapping Kael Anosh

    Creating this map required an extensive number of assets to accurately depict the city’s intricate layout while maintaining visual diversity. To avoid repetitive patterns, I designed six different common buildings for most of the city and three distinct structures for the noble families. The rest such as the Onyx Flower are unique assets. Each of these was carefully placed by hand.

    Beyond the residential areas, additional assets were needed to illustrate the market, city walls, docks, ships, natural rock formations, and other details. As the project progressed, the required level of detail shifted—each asset became smaller on the canvas, yet many retained a higher level of intricacy than was ultimately necessary.

    The Process

    The assets were modeled in Blender and rendered in an isometric view using a simple ambient occlusion shader. The renders were then imported into Krita, where they were drawn over and gradually refined to achieve the final visual style. The decorative borders were created using Inkscape.

  • Map of Fyera

    Map of Fyera

    This is the original design for the map of Fyera, created for the Soulmist 5e tabletop role-playing game.

    Fyera is a dark fantasy world with strong post-apocalyptic elements, set on a planet that no longer rotates on its axis. The landscape is filled with inhospitable regions, and the few remaining denizens must constantly struggle for survival—whether against the invading forces of the Darklands or each other.

    The creator of the Soulmist IP was deeply inspired by The Lord of the Rings and Tolkien’s works as a whole. My goal for this project was to emulate the distinctive look of the Middle-earth map while adapting it to the unique geography of this setting, as outlined in the project brief.

    The landmass depicted is roughly the size of a small continent. On the far western edge of the map lie the Lands of the Old Days, a sun-scorched wasteland that remains in daylight year-round. On the far eastern side are the Darklands, a region forever shrouded in darkness.

    The Challenges of Mapping Fyera

    The foundation of the map was created using Wonderdraft and later refined in Krita, taking approximately a full working week to complete. One of the greatest challenges was achieving a proper sense of scale—especially in regions with dense visual details, such as the southern rainforest-like territory of Draxes. While striving to maintain the aesthetic of The Lord of the Rings movie maps, I had to carefully balance intricate asset placement with overall readability.

    Lessons Learned

    This was the first map I ever created, and it came with valuable lessons. One key takeaway was realizing that a small number of well-placed assets can effectively convey an environment. For example, a dense forest doesn’t require hundreds of individual tree icons to be visually convincing. While the style I was emulating does rely on numerous assets to depict forests and mountain ranges, I now see the value of using them more sparingly in future projects to improve clarity and efficiency.

    Another key lesson I learned was the importance of incorporating more waterways—rivers, streams, and other bodies of water—throughout the map. Given that this represents a vast continent, the relative lack of major rivers makes the landscape feel less believable and distorts the intended sense of scale.

    While this map is meant to be an in-universe artistic rendition rather than an accurate navigational tool, small details like additional river systems would have significantly improved its realism and cohesion.

  • Imprecision and Overflow

    Have you heard about the Boeing 787 that needed to be rebooted after a set amount of days in order to prevent potentially catastrophic consequences ? This was due to a bug where a counter in the generator overflowed when it could no longer store the amount of seconds it had been running since the last reboot. How about the Y2K when we thought the world was going to end when the computer clocks turned from 1999 to 2000 ? Similar issue there and it all has to do with Bits and the way we use them. Problems like this are a more common occurence in the world of computing than you might think. In our world we humans have the luxury of being able to use an infinite amount of real numbers to tackle our problems, but in world of computers where we use bits to represent real numbers we often run into issues because we only have access to a finite number of bits.

    So what happens when you are trying to compute something and you run out of bits ? The answer is that it depends on the datatype. Since our computer’s memory is finite to begin with, we can only afford to allocate a certain number of bits for our various data types such as the well known int and float. As our programs run and over time the bits we have assigned to our variables get “used up” we may run into certain issues that programmers need to be aware of.

    Thus we enter the world of ‘floating point imprecision’ and ‘integer overflow’. To demonstrate the issues with these occurences we will write a couple of programs in the C programming language.

    Floating Point Imprecision

    When we need to work with a decimal number the computer converts it to a floating point representation in binary. However due to the aforementioned finite amount of bits assigned our data types, the converted number is a close approximation rather than an exact one. This leads to small errors which can accumulate within our calculations leading to imprecise results.

    In this program we simply add the amount of y to x ten times and then print the result to the console.

    The program prints 2.0 which seems correct and we move on. But is it correct ? As we mentioned already when we convert our decimal numbers to floating point representations in binary the results are an approximation and thus contain small errors. We should be able to see this accumulation of errors in our program if we simply increased the amount of times that the loop iterates over to a larger number like 50000. Under normal circumstances when ignoring the concept of an error the expected result would be 50000 times 0.1 plus 1 which amounts to 5001.

    Lets see what the computer thinks.

    We can clearly see that the error indeed exists and that it accumulates over time as expected. Sometimes the result will be more than the expected number and others it will be less but the point of discussion is that it is there and it affects our computing. The longer we let our program run the bigger the error will be.

    Using our understanding of the issue so far it should be clear that it is not possible to entirely alleviate FPI because it is a fundamental limitation of our way of representing real numbers using a finite number of bits. The solution to our predicament is to “lessen” its impact using better e.g more precise data types. When we say more precise we actually mean that we use more bits to represent the data held within the data type which in theory should make our problem less noticeable. In C, a ‘more precise’ data type than float would be a double or double-precision floating point. Let us change our program so that it uses double instead of float and then check the results.

    This time with improved precision the results are :

    This seems to fix the problem although it is important to understand that this issue cannot be fixed , it can only be improved upon with “better” data types which should be carefully assigned according to the needs of the application that is being designed. In fact if we change our program to iterate from 50.000 to 5.000.000 we will see the error become noticeable again. For scientific or financial applications where precision is key there are better data types that can be used such as the long double. Additionally there are libraries out there that improve upon the issue such as Multiple Precision Floating-point Reliable (MPFR) and GNU Multiple Precision (GMP).

    Integer Overflow

    Similarly when we talk about integer overflow we are facing the problem of our int data type running out of bits to represent real numbers. When that happens it kind of “rolls over” from its maximum which just “overflowed” to its minimum.

    The maximum and minimum values of integers are determined by the number of bits used to represent the integer.

    In most modern computers, integers are represented using a fixed number of bits, typically 8, 16, 32, or 64 bits. The number of bits used to represent an integer determines the range of values that can be represented by that integer.

    For example, an 8-bit integer can represent values from -128 to 127, while a 16-bit integer can represent values from -32768 to 32767. A 32-bit integer can represent values from -2147483648 to 2147483647, while a 64-bit integer can represent values from -9223372036854775808 to 9223372036854775807.

    Lets write a program to demonstrate integer overflow in action. In the following program we will have a never ending for-loop which doubles the value of i on each iteration. We use the <unistd.h> header in order to have the sleep function delay each iteration of the loop by one second so we can witness and comprehend the results in real time.

    As our i gets in the billions by reaching 1073741824 it tries to double itself one more time which means it would reach the value of 2.147.483.648, just 1 higher than the maximum positive value of an int on my system. Surpassing this value means the int overflows its allocated bit size and falls back into its minimum value.

    Likewise with the FPI we can use a “better” data type in order to accomodate our needs of an integer substantially higher than two billion. In this case we could use the long int data type. If you need even higher range you could opt for using the long long int.

    Notice how in the printf function we changed the format code from %i to %li to account for our data type being of the long variety this time around. It should take substantially more time to reach the maximum.

    Works like a charm.

    Another way to increase the maximum limit of your integers without using a bigger data type such as long is to use unsigned int over just int. An unsigned int cannot be a negative number but retains its range which means that it will have a greater positive maximum than a normal int. On my machine that maximum is 4.294.967.295.


    In conclusion, floating point imprecision and integer overflow are evidently important issues that can affect the accuracy and correctness of a program. You can read some real world examples of problems caused by FPI and IO over at Wikipedia. These examples demonstrate the importance of being aware of floating point imprecision and integer overflow, and taking the appropriate measures to avoid them in order to prevent serious problems in real-world applications.

    Resources

    1. If you would like to learn more about how to calculate the minimum and maximum values for data types you can read this great post by Nickolas Teixeira Lanza on medium.
    2. If you would like to learn more about bits and how we’ve used them to design computer programming as we know it check the beginning of CS50 – Introduction to Computer Science by Harvard. Its free !
  • Sword in the stone

    Sword in the stone

    The scene was modeled and rendered in Blender. Post process done in Krita.

  • Black Lotus

    Black Lotus

    This magical lotus flower was made under the inspiration of Black Lotus, the legendary card from Magic: The Gathering. It was modelled procedurally with Houdini and rendered with Redshift.

    While working on the project various variations came into existence such as the following:

  • Magister’s Terrace

    Magister’s Terrace

    The palace of the magister Thel

  • Resonance

    Resonance

    Made as a cover for an Old World of Darkness Vampire-Mage crossover campaign back 2023.

  • Iceflower

    Iceflower

    A flower made of magical ice. Still image extracted from an animation. Made in Houdini

  • Temple of Esoteric Doctrine

    Temple of Esoteric Doctrine

    This is the temple of a cult turned into a widespread religion.

  • Necropolis

    Necropolis

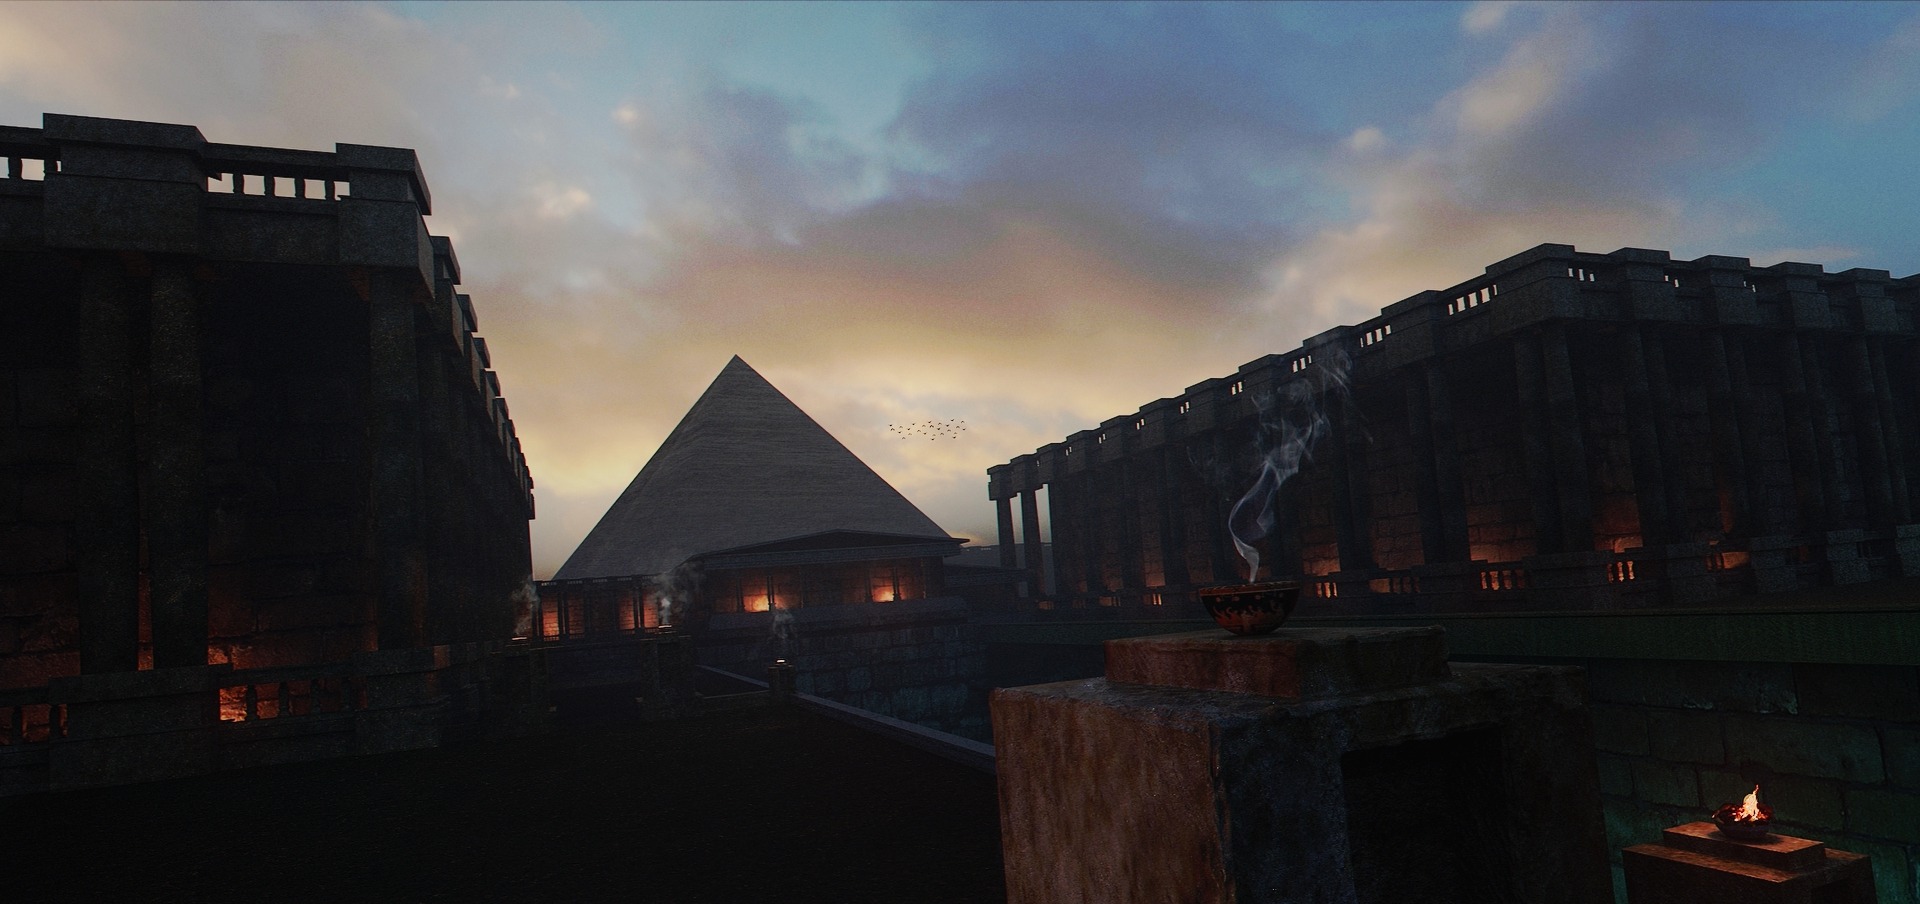
    A mastaba (/ˈmæstəbə/ MASS-tə-bə,[1] /ˈmɑːstɑːbɑː/ MAHSS-tah-bah or /mɑːˈstɑːbɑː/ mahss-TAH-bah), also mastabah or mastabat) is a type of ancient Egyptian tomb in the form of a flat-roofed, rectangular structure with inward sloping sides, constructed out of mudbricks or limestone. These edifices marked the burial sites of many eminent Egyptians during Egypt’s Early Dynastic Period and Old Kingdom. Non-royal use of mastaba continued for over a thousand years.

    I imagined a really big tomb whose top could be populated with various structures such as small temples and other buildings whose function could be useful to religious events related to the person buried inside the tomb. In the background we can see the pyramid of the leader that the person inside the mastaba died in service to.

    3D scene, made in Maya with small edits done in photoshop.

    Old work, made in 2016